
A while ago I was researching the possibilities to measure the power consumption of some devices in my house via Wifi. I came across the Broadlink SP3S Smart Plug. It met my requirements: relatively cheap, power measurement and Wifi. It comes with an IOS and Android App. There a big chance the app is not directly connecting to the SP3S, but to “the Cloud” where the SP3S sends its data to. This is how most companies design their products nowadays. I wasn’t really looking forward to share my power consumption data with Broadlink in “the Cloud”. With the App you can also turn the power on/off, which scares me a little bit. The Broadlink Cloud controlling this power switch. Nah, not for me.
I will explain how I installed the Broadlink SP3S without it making a connection to the internet and show how I use a python script to read the power meter data from the SP3S, store it to InfluxDB and use Grafana to display the collected data in a graph.
Note: When you want to buy a Broadlink SP3S, please make sure you buy the SP3S and not the SP3, which only is a power switch, not a power meter.
Install the Broadlink SP3S
In the step-by-step instructions below I will configure the SP3S to connect to my Wifi so I can connect to it from my local network to retrieve the power meter data. I use a laptop running Linux to connect to initially connect to the SP3S to configure it. I also run a Debian Linux machine as router to control the firewall between the local network and the internet.
- Plug the SP3S in a wall socket
- Press the On/Off button for 6 seconds to reset the SP3S. The power button starts blinking rapidly.
- Press the On/Off button another 6 seconds to enable the Wifi Access Point on the SP3S. The power button blinks rapidly with pauzes.
- Connect to the Wifi Access Point, it should be called “BroadlinkProv”
- Look up the MAC address of the SP3S
$ ip neigh
192.168.10.1 dev wlp3s0 lladdr 34:ea:34:79:7b:ff REACHABLE
- Block the MAC address to access the Internet in the router (I’m using a Debian Linux machine as router). It is important to block the MAC address before connecting the SP3S to your Wifi network so that it will never be able to access the internet.
$ iptables -A FORWARD -m mac --mac-source 34:ea:34:79:7b:ff -j DROP
$ ip6tables -A FORWARD -m mac --mac-source 34:ea:34:79:7b:ff -j DROP
- Use python-broadlink to configure the SP3S to connect to the Wifi network
$ git clone https://github.com/mjg59/python-broadlink
$ cd python-broadlink
$ python3 -m venv venv
$ . venv/bin/activate
$ pip3 install pyaes
$ mkdir lib
$ ln -s broadlink lib/broadlink
$ python3
Python 3.5.3 (default, Sep 27 2018, 17:25:39)
[GCC 6.3.0 20170516] on linux
Type "help", "copyright", "credits" or "license" for more information.
>>> import broadlink
>>> broadlink.setup('myssid', 'mynetworkpass', 3)
- Now you will get disconnected from the SP3S Wifi Access Point. The SP3S will connect to the Wifi network configured above
When this firewall rule is added to the router as well, you will see that the SP3S immediately tries to connect to the internet.
$ iptables -I FORWARD -m mac --mac-source 34:ea:34:79:7b:ff -j LOG --log-level debug --log-prefix "Broadlink: "

$ tail /var/log/syslog
Broadlink: IN=eth1 OUT=eth0 MAC=e0:69:95:73:10:bf:34:ea:34:79:7b:ff:08:00 SRC=10.0.0.199 DST=13.231.11.213 LEN=76 TOS=0x00 PREC=0x00 TTL=63 ID=258 PROTO=UDP SPT=16404 DPT=16384 LEN=56
Broadlink: IN=eth1 OUT=eth0 MAC=e0:69:95:73:10:bf:34:ea:34:79:7b:ff:08:00 SRC=10.0.0.199 DST=13.231.11.213 LEN=76 TOS=0x00 PREC=0x00 TTL=63 ID=259 PROTO=UDP SPT=16404 DPT=1812 LEN=56
Broadlink: IN=eth1 OUT=eth0 MAC=e0:69:95:73:10:bf:34:ea:34:79:7b:ff:08:00 SRC=10.0.0.199 DST=13.231.11.213 LEN=76 TOS=0x00 PREC=0x00 TTL=63 ID=260 PROTO=UDP SPT=16404 DPT=8080 LEN=56
Broadlink: IN=eth1 OUT=eth0 MAC=e0:69:95:73:10:bf:34:ea:34:79:7b:ff:08:00 SRC=10.0.0.199 DST=13.231.11.213 LEN=76 TOS=0x00 PREC=0x00 TTL=63 ID=261 PROTO=UDP SPT=16404 DPT=80 LEN=56
Broadlink: IN=eth1 OUT=eth0 MAC=e0:69:95:73:10:bf:34:ea:34:79:7b:ff:08:00 SRC=10.0.0.199 DST=13.231.11.213 LEN=76 TOS=0x00 PREC=0x00 TTL=63 ID=262 PROTO=UDP SPT=16404 DPT=8090 LEN=56
Broadlink: IN=eth1 OUT=eth0 MAC=e0:69:95:73:10:bf:34:ea:34:79:7b:ff:08:00 SRC=10.0.0.199 DST=54.238.198.224 LEN=76 TOS=0x00 PREC=0x00 TTL=63 ID=263 PROTO=UDP SPT=16404 DPT=16384 LEN=56
Broadlink: IN=eth1 OUT=eth0 MAC=e0:69:95:73:10:bf:34:ea:34:79:7b:ff:08:00 SRC=10.0.0.199 DST=54.238.198.224 LEN=76 TOS=0x00 PREC=0x00 TTL=63 ID=264 PROTO=UDP SPT=16404 DPT=1812 LEN=56
Broadlink: IN=eth1 OUT=eth0 MAC=e0:69:95:73:10:bf:34:ea:34:79:7b:ff:08:00 SRC=10.0.0.199 DST=54.238.198.224 LEN=76 TOS=0x00 PREC=0x00 TTL=63 ID=265 PROTO=UDP SPT=16404 DPT=8080 LEN=56
Broadlink: IN=eth1 OUT=eth0 MAC=e0:69:95:73:10:bf:34:ea:34:79:7b:ff:08:00 SRC=10.0.0.199 DST=54.238.198.224 LEN=76 TOS=0x00 PREC=0x00 TTL=63 ID=266 PROTO=UDP SPT=16404 DPT=80 LEN=56
Broadlink: IN=eth1 OUT=eth0 MAC=e0:69:95:73:10:bf:34:ea:34:79:7b:ff:08:00 SRC=10.0.0.199 DST=54.238.198.224 LEN=76 TOS=0x00 PREC=0x00 TTL=63 ID=267 PROTO=UDP SPT=16404 DPT=8090 LEN=56
Let’s try to find out what the destination IP addresses are by using tcpdump.
$ tcpdump -ni eth1 host 10.0.0.199 and port 53
tcpdump: verbose output suppressed, use -v or -vv for full protocol decode
listening on eth1, link-type EN10MB (Ethernet), capture size 262144 bytes
12:38:22.460717 IP 10.0.0.199.1169 > 10.0.0.7.53: 0+ A? 38010main.broadlink.com.cn. (44)
12:38:22.460870 IP 10.0.0.7.53 > 10.0.0.199.1169: 0 1/0/0 A 13.231.11.213 (60)
12:38:38.480835 IP 10.0.0.199.1171 > 10.0.0.7.53: 0+ A? 38010backup.broadlink.com.cn. (46)
12:38:38.480962 IP 10.0.0.7.53 > 10.0.0.199.1171: 0 1/0/0 A 54.238.198.224 (62)
So the SP3S immediately tries to contact 38010main.broadlink.com.cn. (13.231.11.213) and 38010backup.broadlink.com.cn. (54.238.198.224) on ports 16384, 1812, 8080, 80 and 8090 once it has a network connection. The iptables DROP rules in my router block this traffic. 🙂
Using broadlink_cli to retrieve meter data
Using “broadlink_cli” from python-broadlink the current energy consumption can be retrieved from the SP3S. To make “broadlink_cli” work, some things need to be modified when using the cloned git repository as python library.
Create a symlink to “broadlink_cli”:
$ ln -s cli/broadlink_cli
Edit “broadlink_cli” and change this:
import broadlink
import sys
To:
import sys
sys.path.insert(0, './')
import broadlink
Retrieve the current usage from the SP3S using “broadlink_cli”:
$ ./broadlink_cli --type 0x947a --host 10.0.0.199 --mac 34ea34797bff --energy
0.0
Turn on the power:
$ ./broadlink_cli --type 0x947a --host 10.0.0.199 --mac 34ea34797bff --turnon
== Turned * ON * ==
Store the power meter data to InfluxDB
The python script below reads the power consumption every 30 seconds from the SP3S and stores it to InfluxDB.
#!/usr/bin/env python3
import sys
import time
import datetime
from influxdb import InfluxDBClient

sys.path.insert(0, './')
import broadlink

name = '<NAME>' # What is the SP3S connected to?
type = int(0x947a) # https://github.com/mjg59/python-broadlink/blob/master/broadlink/__init__.py#L25
host = '10.0.0.199'
mac = bytearray.fromhex('34ea34796e9c') # The MAC address of the SP3S (without colons!)

dev = broadlink.gendevice(type, (host, 80), mac)
influx_client = InfluxDBClient('<INFLUXDB_HOSTNAME>', 8086, '<USERNAME>', '<PASSWORD>', '<DATABASE>')

def get_data():
    dev.auth()
    return dev.get_energy()

def influx(value):
    if value is None:
        return
    json_body = [
        {
            "measurement": name,
            "time": datetime.datetime.now(datetime.timezone.utc).replace(microsecond=0).isoformat(),
            "fields": {
                "usage": float(value),
            }
        }
    ]
    try:
        influx_client.write_points(json_body)
    except:
        print('Failed to write to influxdb')

while True:
    try:
        influx(get_data())
    except Exception as err:
        print('Error: %s' % str(err))
    time.sleep(30)
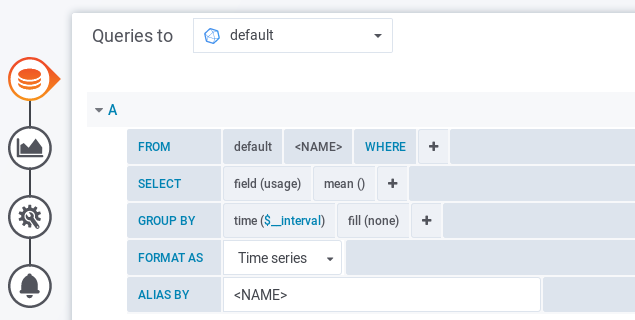
Graphing the result in Grafana
In grafana use this configuration for the graph. Replace with the name that is in the script.
Some interesting results
Measuring the power usage of several devices gives interesting insight in what a device is actually doing power-wise. Some examples are below.
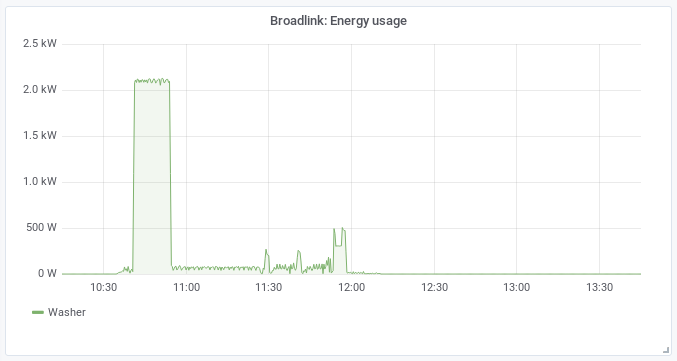 The washer consumes around 2200 Watt at the beginning of a ~1:45h, 40°C program. And at the end about 500 Watt to centrifuge to dry the clothes a little bit.
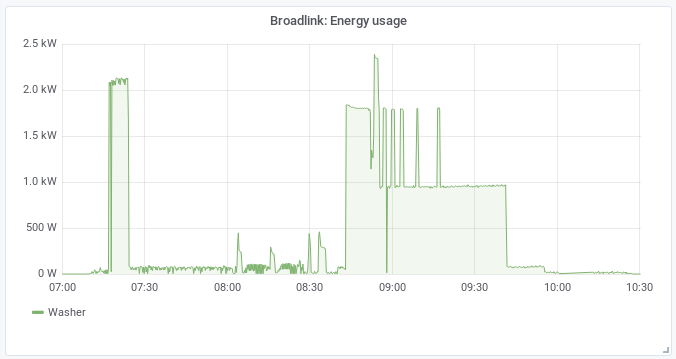
 The washer consumes 2200 Watt a bit longer in case of a ~1:45h, 60°C program.
 My washer is actually a wash-dry combination. When starting the dry program after a ~1:45h, 40°C program you see that drying consumes even more energy than washing.
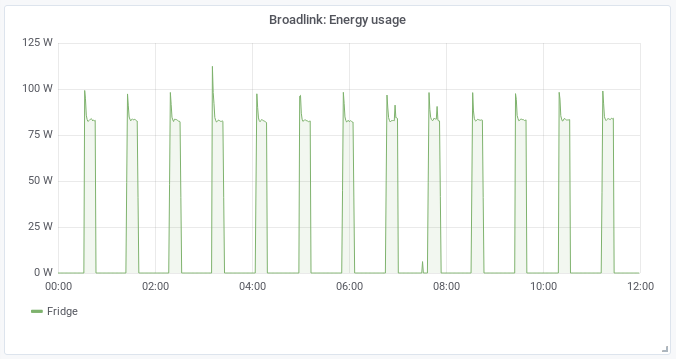 The fridge consumes around 80 Watt about 30% of the time too keep the fridge cool. When you look good you actually see 3 mini-spikes in the morning where I opened the fridge and the light turned on.
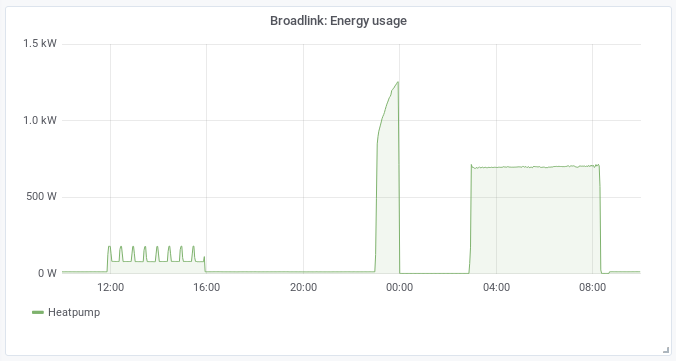
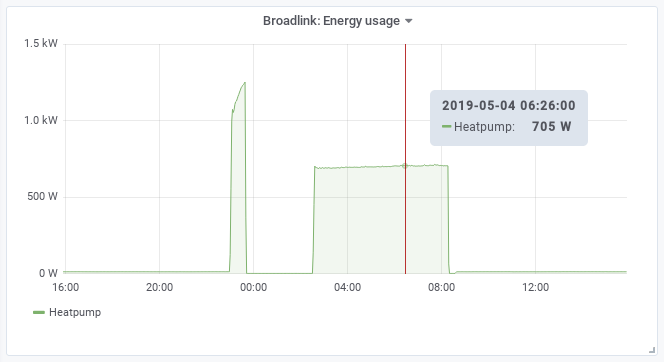 The electric heatpump starts heating the 150 liter hot water tank at 23:00. It ramps up to 1250 Watt. It starts exactly when electricity switches to low tariff, smart 🙂 The heatpump also heats the house and tries to keep it around one temperature level. This is the most power efficient for a well isolated house they say. The heatpump is consuming 700 Watt for this continuously when it gets colder in the house during the night.
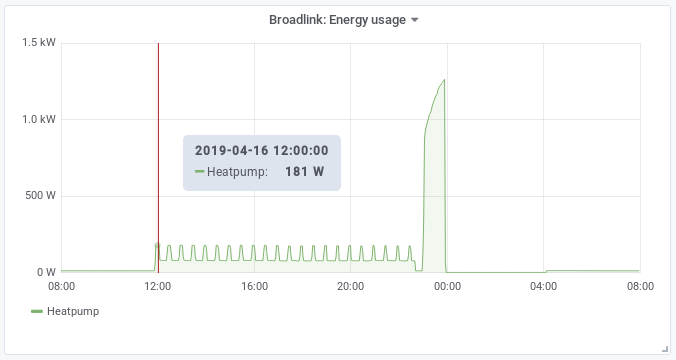 When it gets too warm in the house the heatpump also has the ability to cool. This is less power consuming than heating.
 And sometimes this heating/cooling system is just stupid. During the day it is too warm and the same night it is too cold.